Friday, October 30, 2015

Super Easy Dinner!

Recently, I was extremely busy but needed to make dinner. What I came up with satisfied us. It was cheap, easy, and tasty, which are pluses in my book any day!


Hamburger Patties and Gravy

1 lb. hamburger (more or less)
1 can cream of mushroom soup
1 1/2 - 2 cans water
1 package dry beef gravy mix
salt, pepper, and seasonings to taste (optional)
Cooked mashed potatoes or noodles

Make patties using the hamburger meat to which you've added salt, pepper, and any seasonings you desire. You can also include a bit of finely diced onion.

Brown the hamburger patties in an oven-proof pot. I use my cast iron and that works super well.

While hamburger patties are browning, mix together the cream of mushroom soup, water, and beef gravy mix. When the hamburger patties have been browned on both sides, pour the soup mixture over the top. Cover the pot with a lid and place in a preheated 350 degree oven; bake until the meat is done and the gravy is bubbling hot. I let mine bake for about 45 minutes with no ill effect--no burning--but it could be because I was using cast iron.

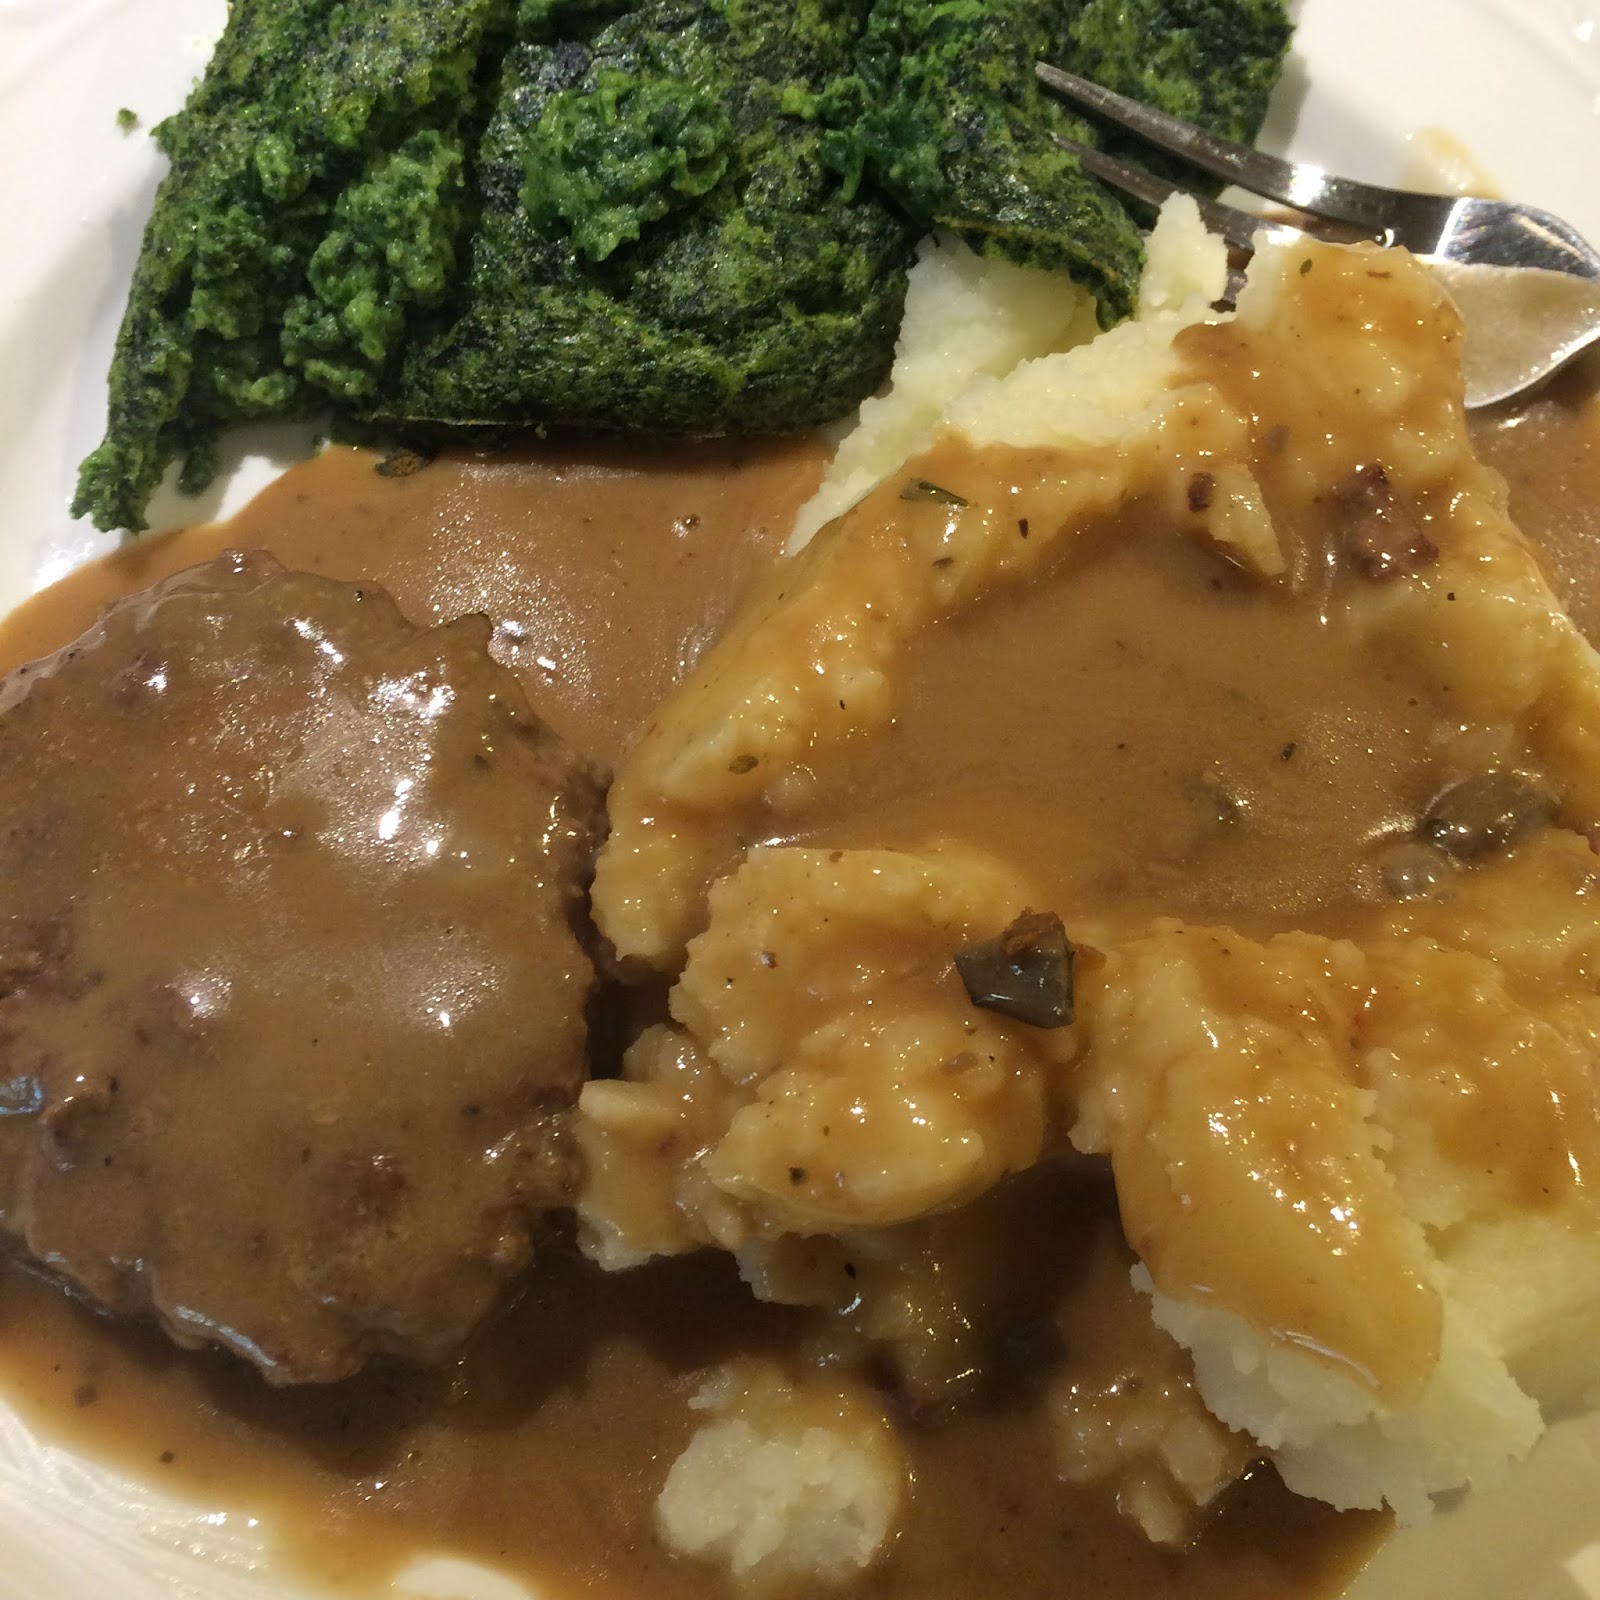
Dish up the hamburger and ladle the gravy over the mashed potatoes or noodles. Serve.

In the photo above, you'll notice the spinach soufflé. It's actually Stouffer's Spinach Soufflé Side Dish. You can find it in the frozen food section of your grocery store. It's good! In fact, I sometimes thaw it out (something you don't need to do if you're baking it in the container it comes in--just follow directions) and stuff large button mushrooms with it. I add a sprinkle of Parmesan cheese and bake them until the soufflé is done, about 45 minutes.

Well, there you have it. I think of this as a semi-cheater's meal because of the canned soup and dry gravy mix. I don't usually go that route, but like I said, I was in a tearing big hurry. And it's still an inexpensive meal, even with the packaged goods, so I thought it was worth sharing.

Hope all is well with you and your loved ones. The hot summer weather and drought conditions have finally broken around here. We have had several rain fronts move through, and today is no different. We are scheduled to have rain for the next week, and I'm glad for it. I just hope our reservoirs fill back up to capacity. (Without, of course, raining so much that flooding becomes a concern.)

Enjoy the weather!
Georgia

Wednesday, October 14, 2015

German Runzas Recipe

I had lots of cabbage. Lots and lots of cabbage. There's just so much sauerkraut you can make before you rebel. So I decided to make German Runzas, which are cabbage and meat stuffed buns. They're easy and delicious. And keep in mind that you can actually add anything you want (even no cabbage if that's your druthers!) and make stuffed buns that will tickle your taste buds.
Runzas with a dollop of sour cream

German Runzas

4 cups shredded green cabbage
1/2 - 1 lb. hamburger
1 small onion, diced
1/2 cup green or red bell pepper (or a combination)
4 cloves garlic, minced
salt and pepper to taste
1/4 - 1/2 tsp. caraway seeds (optional)
bread dough, enough for 2-3 loaves (see note below for an easy workaround)

Brown the hamburger; only drain off fat if there's a lot. Some fat is good because it soaks into the buns while baking. Add the cabbage, onion, bell pepper, and garlic and saute until the onion is translucent and the hamburger is cooked, about 5 minutes more. Add salt, pepper, and caraway seeds (if using) to taste. Add a spritz of water or broth so the filling isn't bone dry. (Although this isn't absolutely necessary, I like to do that.)
Runza filling


Now turn your attention to the bread dough.

NOTE: You can actually buy bread dough or even pizza dough at the grocery store if you don't have the time to make your own. But you do need to use a yeast-raised bread dough of some kind. (Not biscuit dough.)

Pull off small hunks of dough and pat or roll them out. You want the dough to be on the thin side, but not so thin that it tears when you add the meat mixture. Mine end up being about 5 inches on each side. Place a spoonful of the meat mixture in the middle of the dough square and wrap the dough around the meat mixture. Seal the edges so it's a little round packet. Place seam-side-down on a greased cookie sheet--although I use my silicon baking mats and I think they make better runzas because the bottoms don't get too brown. But suit yourself.

Preheat the oven to 425 degrees. Place the runzas in the oven and immediately turn down the heat to 375 degrees and bake for about 25-30 minutes. (The time will vary depending on how big and how thick your runza buns are, so check them after about 20 minutes.)

Plate them up and serve them with sour cream. Yum!

Talk about simple. And tasty. And filling. And cheap. Some of my favorite attributes for meal-getting.

Be creative. Really, you could make just about any kind of stuffed bun, so use what you have on hand and enjoy the adventure.

Blessings to you and yours. I hope you are enjoying the cooler days of autumn. The leaves are changing color and it's a beautiful sight to behold. I love this time of year!

Georgia


Sunday, September 6, 2015

Cheesy Sausage Biscuits--Another Great School Day Breakfast!

I saw this recipe on the Internet and I wish I could give kudos where they are due. I think I saw it on a site called--believe it or not--Mob Boss. Go figure!

Anyway, I've been thinking about all the kiddos returning to school and since I believe strongly that a good breakfast is the foundation to a good day at school, I wanted to share this recipe for y'all. It took me about 5 minutes to put together and get in the oven. Can't get much quicker than that.

Cheesy Sausage Biscuits

3/4 - 1 lb. sausage (I used some Jimmy Dean's original and it was tasty, but cook's choice)
4 eggs
1 cup shredded cheddar cheese
1 cup Bisquick
couple shakes of salt (optional)

First, turn on the oven to 350 degrees so it has a chance to preheat while you're making the batter.

Grease a 12-cup muffin tin and set aside. (I was in a slothful mood, so I used a spray can of olive oil instead of hand greasing with Crisco or butter, which I'm sure would be good also.)

Next, cook the sausage. I just made sure that the pink was gone but didn't feel I needed to cook it too brown since it would continue baking in the oven. Worked like a charm.

In a medium mixing bowl, beat the eggs well. Add the cheddar cheese and mix well again. Next, add the Bisquick and the shakes of salt and mix well. (I used a large spoon for this.) Now, add the cooked sausage and mix well for the last time. When I added the sausage from the frying pan that I had cooked it in, I simply dumped everything into the mixing bowl--grease and all. The sausage I used seems to be quite lean and there was almost no grease. But if you're squeamish about that, you can always drain off the fat before adding it to the batter.

Bake for 20 minutes and voila! Breakfast is ready.

I was reading in Psalms today and Psalm 5:3 really heartened me. I hope it will encourage you as well: "In the morning I will order my prayer to Thee and eagerly watch."

Our part in this is to establish morning prayers. But God says we can eagerly watch, and I like to think that what we are watching for is how He unfolds our days. I realize that life isn't always easy. In fact, in the last two weeks I've experienced two very traumatic, life-changing events. I'll admit that I got a bit off-kilter there for a few days, but I continued to pray, even though most of my prayers were nothing more than "Help me! Help me!" And I can honestly say that--while I still struggle against anxiety sometimes--I am learning to eagerly watch and wait for His gracious presence in my every day. That's my hope for you too.

So carry on! Show your love and light.

Georgia

Saturday, September 5, 2015

Ham and Cheese Breakfast Casserole--Perfect for School Days--Or Any Days!

School will be starting for our little ones next week, and that means busy--and early--mornings. But we all know that breakfast is the most important meal of the day (I think all mothers have said that!), so starting our scholars out with good food in their tummies is a good habit to develop.

Well, this breakfast casserole can be made the night before and refrigerated and then baked in the morning. Perfect! But it can also be put together and baked immediately for those weekends when you have a bit more time to lollygag in the kitchen preparing breakfast. And it tastes good too. No vegetables for picky little eaters, but lots of good protein to keep them full and energized for hours.


Ham and Cheese Breakfast Casserole

12 slices bread (more or less)
1 lb. thinly sliced ham (I've used sliced deli ham, leftover ham from dinner, and even canned ham, which I usually dice instead of slice, like this can):
2 cups shredded cheddar cheeses, divided
6 large eggs
3 cups milk
1 tsp. dry mustard powder
1 tsp. onion powder
1/2 tsp. salt
1/2 tsp. pepper
1/4 cup butter, melted
2 cups cornflakes, crushed

Butter or grease a 9 x 13-inch baking dish and preheat over to 350 degrees.

Line the buttered baking dish with 6 slices of bread. Layer half of the ham over the bread and sprinkle with half of the cheese. Repeat these layers one more time.

In a large mixing bowl, combine eggs, milk, dry mustard, onion powder, salt, and pepper and mix well. Slowly pour the egg mixture over the bread layers in the baking dish.

NOW: If you are going to bake this in the morning, cover it with plastic wrap and refrigerate it overnight. The next morning, take the casserole out of the fridge and let it set while you complete the next step.

Mix the melted butter with the crushed cornflakes and sprinkle evenly over the top of the casserole.

Bake 45-50 minutes or until set. If you refrigerated it overnight, you'll need about 5-10 minutes more to get it completely baked because it started out cold.
Pretty tasty stuff.

The change of seasons is just beginning to be felt around these parts. We finally got a bit of rain, and I noticed that the leaves are starting to turn colors. I love this time of year! (But then I say that every season!)

I hope the coming months are filled with nothing but smooth sailing for you and your loved ones. Love one another well. It can make all the difference!

Blessings to you and yours,
Georgia


Wednesday, August 19, 2015

The Hutterite Diaries

Good morning, all!

I recently purchased the book, The Hutterite Diaries, by Linda Maendel, who is herself a Hutterite.


It's a fascinating and well written look into one woman's Hutterian worldview, and often the stories are about her day-to-day life in the colony where she lives. Hutterites are a Plain sect that began around the same time as the Amish and Mennonites, and like the other Plain groups, they eventually immigrated to North America. Today there are Hutterite colonies in the northern tier of the United States as well as in Canada. They use modern equipment and technology and grow grains and other crops on massive acreage that's owned by the individual colonies. They eat communally in a centrally located building, but each family has their own home.

I'm so glad I got this book because it's given me a better understanding of this particular people group. Next, I plan on researching their cooking traditions and who knows--maybe I'll post a blog or two with a tasty Hutterite recipe!

Blessings to you and your loved ones. I hope life is treating you gently these days.
Georgia

Tuesday, August 11, 2015

Gather Around the Amish Table Book Endorsement

Hello, all!

Some months ago I was approached and asked to write an endorsement for a cookbook, which I was happy to do. They promised me a complimentary copy once it was in print, and true to their word, I found this in my mailbox today.

I took a quick peek inside and I'm looking forward to relaxing with a hot cup of tea and going through it at my leisure. The recipes appear to be plain, with no exotic ingredients--the kind of food that many families seem to relish. But what I think I'll enjoy even more are the short "diaries" of the Plain cooks who contributed family favorite recipes.

The book is put out by Herald Press (www.heraldpress.com) and retails for $19.99. It has some great color photos of some of the foods featured in the cookbook, and would more than likely be a great addition to your collection.

Enjoy!

May today find you and your loved ones in good health and spirits.
Georgia


Sunday, August 9, 2015

Fabulous Wheat Bread Recipe

Two events came together in my little world that resulted in this wonderful bread recipe. First of all, yesterday I canned 46 pounds of albacore tuna, so of course I wanted to have a tuna sandwich for lunch today. But I had no bread. What to do? I could run to the store and buy a loaf, which I do when I'm busy, but the thought of home-canned tuna on homemade bread wouldn't be dislodged from my mind, so this morning early I set about making bread.

I ground up some hard white wheat berries and got a quart of wheat flour, which I figured would be plenty for a single loaf. I also decided that I wanted to throw in some of my powdered buttermilk (I've set myself to the task of finding ways to use powdered buttermilk because it's so handy to have around.). I wasn't planning on making anything complex--just your average loaf of good tasting bread.

But of course, it didn't turn out as I planned, and it's all my fault. (I really need to stop daydreaming while I'm cooking!) Suffice to say that I added way too much yeast (enough for 2-3 loaves, rather than 1!) in the proofing batter. Further, I'm a frugal person, so I couldn't conscience throwing out a perfectly good bowl of bread starter. So I changed plans midstream.

To wit:

Honey Buttermilk Wheat Bread (makes 3 loaves)

1 1/4 cups warm water
4 1/2 tsp. yeast
1/3 cup honey
6-8 T. melted butter
8 T. buttermilk powder
2 cups water
1 T. salt
1 egg, slightly beaten
4 cups wheat flour
4 cups+- regular flour

Grease or butter one large mixing bowl; set aside for now.

In another large mixing bowl, mix together the 1 1/4 cups warm water, yeast, and honey. Let set for about 10 minutes or until the mixture starts to bubble and froth.

Add remainder of ingredients except the regular flour. Mix together with a large wooden spoon. When well mixed, begin to add the regular flour, about a cup at a time and then mix well after each addition. When the dough pulls away from the mixing bowl and forms a loose ball, dump dough onto a floured surface and knead for about 10 minutes, adding small amounts of flour as needed so the dough doesn't stick on your counter or bread board. Form into a ball and place in the greased mixing bowl. Cover with a clean towel and let the dough rise until doubled, about 1-1 1/2 hours.

When ready to proceed, grease 3 loaf pans and set aside. Form the dough into 3 loaves and place them in the prepared loaf pans. Cover with the clean towel and let them rise until about doubled. (The loaves will be about 1-2 inches above the top of the pan at their highest peak.)

Preheat oven to 375 degrees. Bake bread for 25 minutes or until done. Remove from pans and let cool on wire racks.

I have a weakness for fresh baked bread so I did what I usually do--and what the "experts" say you should never do. I cut into one of the loaves minutes after pulling them from the oven so I could slather butter onto a thick heel slice. Heaven!

This is a good recipe--perfect as sandwich bread or toast. The texture is soft and small crumbed (no doubt from the egg and all that butter!), and when completely cooled down you can cut lovely, thin slices if that's your druthers. The only thing that niggles is that it's not the cheapest bread recipe to make, but it still beats the price I would pay for 3 loaves of organic wheat bread at the store. And the freshness and taste can't be improved upon.

Lunchtime, please get here quick. I've got tuna fish sandwiches on the brain!

Hope all is well in your part of the universe. Blessings to you and yours!

Georgia